
“How To” Bias Videos
We finally got to this! Our intent was to learn a little about digital video and be able to do a decent job on this but we quickly found out that it would
take a while... So, we did it quick and dirty just to get the info out for you.
We get SO MANY customers asking “how do I bias my amp? And can the average person really do it?” A lot of players will read through some of
the websites that are on the net which explain the process and even show pictures of the process but do not feel that they can do it themselves.
We even get lots of questions on how to change tubes, so we decided to put up some short videos on some of these subjects.
The links below will take you to the video page where you will find an embedded video and you will also find additional pic's and tech notes on
most of these pages.
So now the usual disclaimer. We of course cannot be responsible for the one guy who might wash his hands, not dry them and then lay them flat
down on the PC board in his amp and light himself on fire... In other words do all of this at your own risk! And we will add "BE CAREFUL!" In amps
like the Fender HRD where you have to get inside the amp there are high voltages available for you to taste test if you get careless. With the 50
and 100 watt 2000 series Marshall's and the Fender Deluxe and other Fender's where the trim pot is located on the outside you are not at nearly
the risk.
With all adjustable bias amps we recommend running in the standby mode for about one to two minutes, then switch to the play mode, check and
set the bias. Then let the tubes get about 5 to 10 minutes worth of heat in them and do a final bias adjustment. The bias will change a bit as the
tubes get good and hot which is where they need to be to sound their best.
Make sure that you have your speakers or speaker plugged into the amp when you bias it!!
"DO NOT" be afraid to bias your own amp! It is simple, just save the adult beverages for after the performance!
Here is a typical response from a customer.
Bob and team-
Thanks for the help and the bias probe and tubes (the sticker is cool too!). I have successfully biased my own amp for the first time! Your videos
and no-nonsense (just get in there and do it!) approach really made the difference! Now that I am comfortable with the process, I will not fear it
any more and will be able to save myself some bucks!
Thanks again,
Troy!
If you have purchased one of the 25.00 Eurotubes bias probes and you have misplaced your instruction sheet you can find a copy HERE.
#1. Fender Hot Rod Deville / Deluxe Bias. PLEASE, DON'T JUST WATCH THE VIDEO! READ THE NOTES ON BIASING!!!
#2. Marshall DSL-TSL Bias.
#3. Fender Deluxe Bias.
#4. Carvin V3, MTS, Legacy Bias.
#5. Generic Bias video using an 800 Marshall.
#6. Peavey JSX, XXX 3120 Bias video using our new Eurotubes "Pro One" Bias Probe.
#7. Peavey - Bugera factory bias test point video.
A note about bias probes: There are two different types of bias probes. The Eurotubes bias probes are the type that reads directly in milliamps by
breaking the connection that supplies the high voltage to the plates of the tube. When using our probe you would set your multimeter to the DC
Amps setting and select a range of 200 milliamps.
The second type of bias probe uses a one ohm resister to measure across one of the pins in the socket. This type of probe measures in millivolts
so you would set your multimeter to the DC volts setting and select a 200 millivolt scale. If you purchased a bias probe from a source other than
Eurotubes then please ask the manufacturer if it measures in millivolts or milliamps before asking us, or attempting to use the probe.
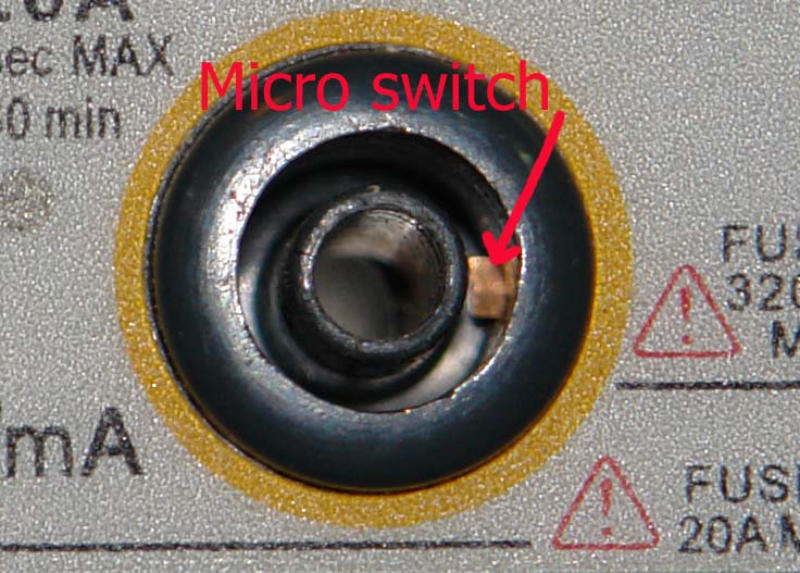
A note about multimeters: There are thousands of different models of multimeters made and we don’t know all of the function settings and jack
types they use by heart. There are some Craftsman and Fluke meters that use shrouded banana plugs and the shroud around the plug actually
pushes on a small momentary micro switch down inside the meter and in this case a non shrouded banana plug will not work unless you insert
something like a wooden tooth pick or a piece of this plastic down inside the outer ring of the jack at actuate the micro switch. You can see the
micro switch actuator in the photo below which is copper colored. Most less expensive models of multimeters do not use these shrouded type
plugs, so in an effort to make our probes universal and work on the vast majority of multimeters we use a good high quality standard banana plug.
This also keeps the cost down because the shrouded plugs are very expensive.

© 1998 - 2020 Eurotubes Inc. All Rights Reserved
All text and images on this website may not be used without express permission. All prices
and product information subject to change without notice.